

At the heart of the Training Builder of SimLab Composer is the Lua scripting language. Recognized for being straightforward, effective, and adaptabe, SimLab Soft provides an API that defines the methods and classes for users to create Lua scripts, catering to their unique requirements. This customization ability transforms the tool into a dynamic platform for fostering creativity and innovation.
The integration of Lua scripting in SimLab Training Builder presents a unique blend specifically designed for users with advanced skills. It allows for the creation of more complex and feature-rich experiences beyond the default capabilities of SimLab Training Builder. This feature enables users to accommodate their training scenarios precisely, adding unique functionalities and details for more immersive and intricate outcomes. It’s an avenue for limitless creativity within SimLab Training Builder environment.
The feature of Lua Scripting is exclusively accessible with the Ultimate edition of SimLab Composer ver. 12.1 or newer, and it’s important to note that this feature is not included in SimLab VR Studio.
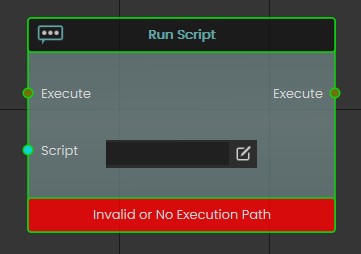
In order to execute your Lua script, you simply need the ‘Run Script’ node graph, show in Figure 1-3. This can be created by simply right-clicking within the view of SimLab Training Builder and choosing ‘Run Script’. This particular node offers the capability to input or compose Lua script. Of course, you have to link the ‘Run Script’ node into your graph execution flow, enabling your script to function smoothly within the overall process.
Bear in mind that the print("Hello World!") function is a key tool in script writing and testing. It helps track data flow and variable states, aiding in identifying issues. It acts like a simple logging system, providing insights into the script’s operation. In short, it’s essential for debugging and understanding your Lua code’s behavior while building up your experience.
Before proceeding further in reading, let’s keep in mind the following key syntax rules in Lua programming:
- Case sensitivity: Lua is a case-sensitive language. This means that
Variable,variable, andVARIABLEare all considered different identifiers in Lua. - Termination: In Lua, it’s not necessary to use a
;at the end of each statement. - Commenting: To comment out a single line, place
--at the start of the line. For commenting out multiple lines, start with--[[the first line and end with]]on the final line. - Array Indexing: In Lua, the convention is to start arrays with an index of 1. However, you can technically start an array at index 0, 1, or any other value. But if you stick to the convention of starting arrays with index 1, you will be able to use Lua’s libraries directly. So, while it’s possible to start an array at index 0, it’s generally more convenient to start at index 1.
Caution: Please be aware that improper use of Lua scripting can lead to unexpected crashes in SimLab VR Viewer. Always test your scripts thoroughly before running them in production. If you encounter consistent crashes, consider reaching out to the SimLab community or support for assistance. Your understanding and caution are appreciated. Happy scripting!
[1] Beginner: Print Hello World!
Just starting out? Don’t fret, you’ll advance beyond this stage swiftly. Let’s execute the simplest script ever by print some text on the screen in a step-by-step manner:
- Download SimLab Composer 12.1 or newer.
- Install SimLab Composer.
- Enter an Ultimate edition key, request a fully featured 21-day free trial, or buy a license.
- Run SimLab Composer.
- As Virtual Reality is the default active workbench, left-click over “Training Builder”, located on the ribbon of the application as shown in Figure 1-1, to open SimLab Training Builder.
- Right-click anywhere within the view of SimLab Training Builder.
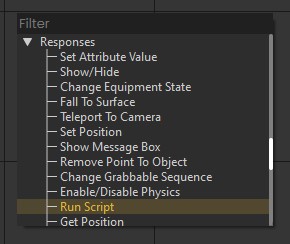
- Search for “Run Script” located under the “Responses” category as shown in Figure 1-2, or type “run script” in the filter text field then hit the Enter key on your keyboard (Note: this node graph is only accessible from the context menu).
- Left-click over “Run Script” to create the node graph in the view as shown in Figure 1-3.
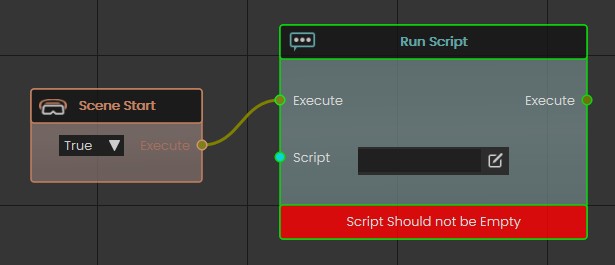
- Left-click over the “Scene Start” located within the “Events” category to create another node graph in the view.
- Connect the “Execute” output port of the “Scene Start” node graph to the “Execute” input port of the “Run Script” node graph as shown in Figure 1-4.
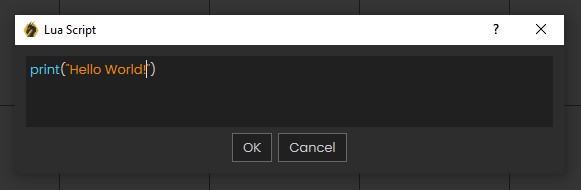
- Left-click the edit button located next to the “Script” input port of the “Run Script” node graph to start typing a Lua script.
- The Lua Script dialog appears as shown in Figure 1-5, type
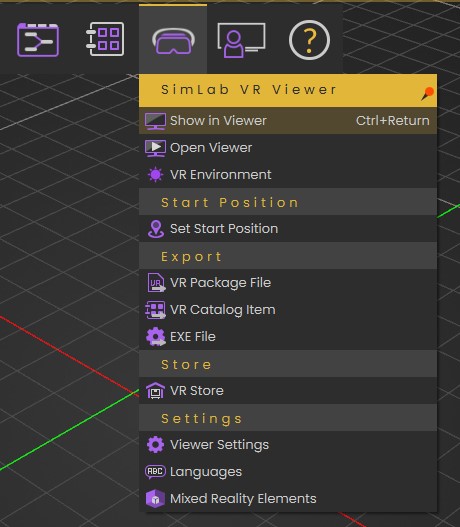
print("Hello World!"), and left-click the OK button. - Go to the “VR Viewer” menu on the application’s ribbon. and left-click over it.
- As the “VR Viewer” menu is revealed, left-click over the “Show in Viewer” option shown in Figure 1-6.
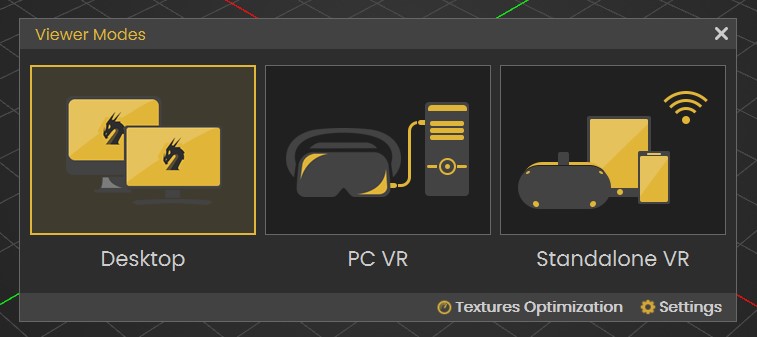
- The “Viewer Modes” dialog box appears which is demonstrated in Figure 1-7, left-click over the “Desktop” button option to start importing the Viewer Start Position.
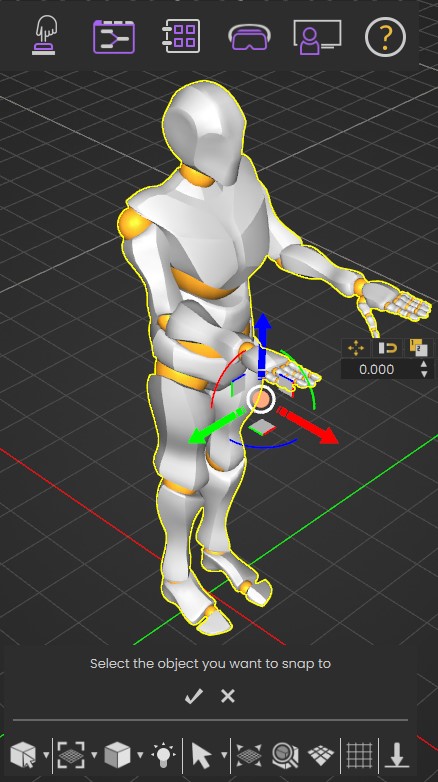
- Left-click over the tick button, shown in Figure 1-8, to finalize the scene for export.
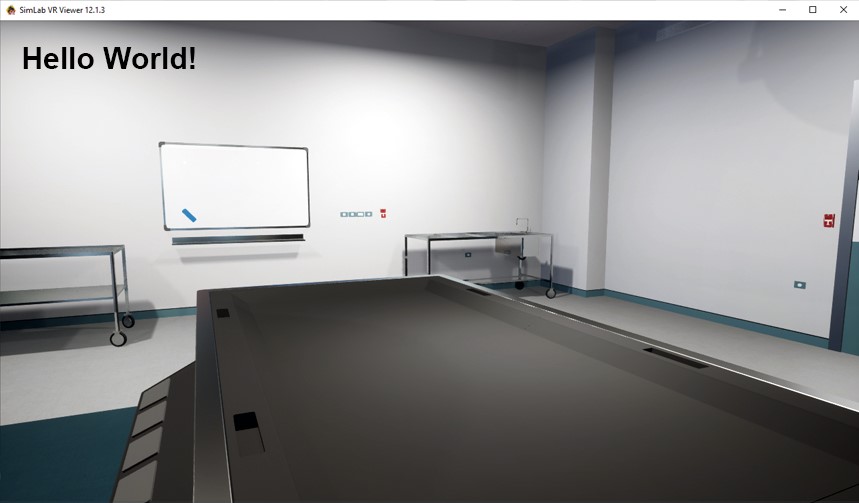
- SimLab VR Viewer will be opened with the message “Hello World!” printed in black on the top-left corner of the viewer as shown in Figure 1-9.
- Congratulation! You did it and successfully ran your first Lua script in SimLab Training Builder.

[2] Intermediate: OpenWeatherMap API
You can use the OpenWeatherMap API for free. They offer a freemium plan that allows you to make limited API calls per day for free.
To start using their APIs, you need to sign up on their website and verify your email, Figure 2-1 shows the account confirmation email. Once you sign up using your email, an API key (APPID) will be sent to you in a confirmation email as shown in Figure 2.2. This API key is all you need to call any of their weather APIs.

The free plan includes access to current weather data for any location, which is collected and processed from different sources such as global and local weather models, satellites, radars, and a vast network of weather stations. The data is available in JSON, XML, and HTML formats.
Here’s an example of a JSON API call:
{
    "coord": {
        "lon": -0.1257,
        "lat": 51.5085
    },
    "weather": [
        {
            "id": 800,
            "main": "Clear",
            "description": "clear sky",
            "icon": "01d"
        }
    ],
    "base": "stations",
    "main": {
        "temp": 290.03,
        "feels_like": 289.39,
        "temp_min": 288.01,
        "temp_max": 291.86,
        "pressure": 1021,
        "humidity": 62
    },
    "visibility": 10000,
    "wind": {
        "speed": 5.14,
        "deg": 70
    },
    "clouds": {
        "all": 2
    },
    "dt": 1715075447,
    "sys": {
        "type": 2,
        "id": 268730,
        "country": "GB",
        "sunrise": 1715055654,
        "sunset": 1715110389
    },
    "timezone": 3600,
    "id": 2643743,
    "name": "London",
    "cod": 200
}
And here’s a basic Lua example of how you might use the OpenWeatherMap API to get the current weather for a specific city. Lua doesn’t have built-in support for HTTP requests, so you’ll need to use the SimLab library.
function on_response()
  --print("Response is received")
  local iterate = http_request:GetResponse()

  local weather_array = iterate:GetArrayField("weather")
  local weather_first_index_object = weather_array[1]:AsObject()
  local json_string = weather_first_index_object:ToString()
  print(json_string)

  local weather_description = weather_first_index_object:GetStringField("description")
  local vr_var = SimLabUtils:GetVariableByName("weather_description")
  vr_var:SetStringValue(weather_description)
end

local your_api_key = "2fd8e44a56f0300246bacf9ec237b6da"
local city = "Amman"
local base_url = "http://api.openweathermap.org/data/2.5/weather"

-- Construct the API endpoint
local endpoint = base_url .. "?q=" .. city .. "&appid=" .. your_api_key

http_request = SimLabUtils:NewHttpRequest()
http_request:SetVerb("GET")
http_request:SetEndpoint(endpoint)
http_request.OnResponse:Add(http_request, on_response)
http_request:ProcessRequest()
In this example, replace 'your_api_key' with your actual API key. The city variable is the city you want to get the weather for. The base_url is the base URL for the OpenWeatherMap API. The endpoint is the specific URL you will send a GET request to in order to retrieve the weather data.
Please note that the temperature is returned in Kelvin by default. If you prefer Celsius or Fahrenheit, you can add &units=metric or &units=imperial to the endpoint respectively.
Enough talking! Now, let’s run the example and see the retrieved data reflected in a VR experience:
- Open SimLab Composer.
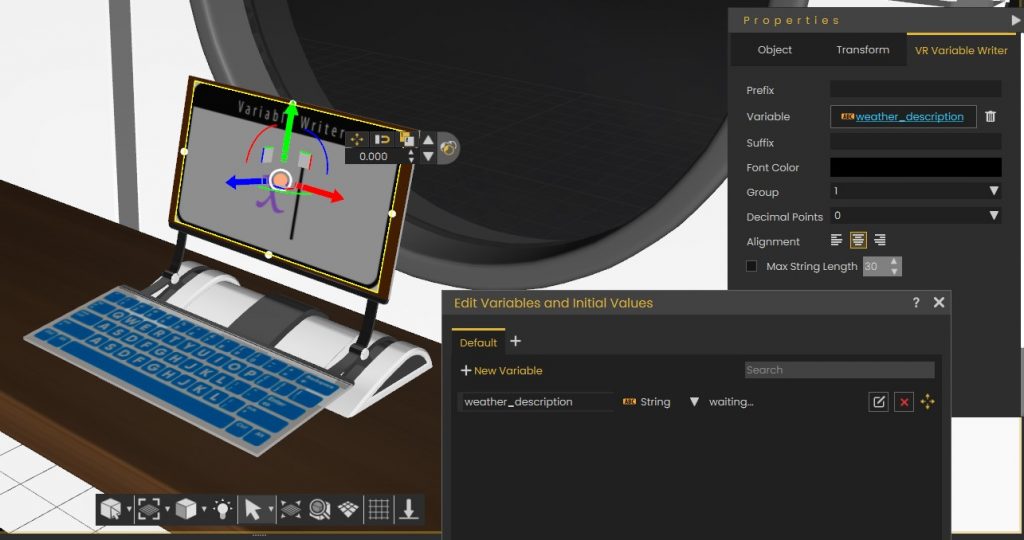
- Create a Variable Writer and place it in the scene.
- Create a VR Variable of type string and rename it “weather_description“.
- Bind the created Variable Writer with the VR Variable as shown in Figure 2-3.
- Open SimLab Training Builder, create “Scene Start” and “Run Script” nodes, and connect them via the “Execute” ports as shown in Figure 2-4.
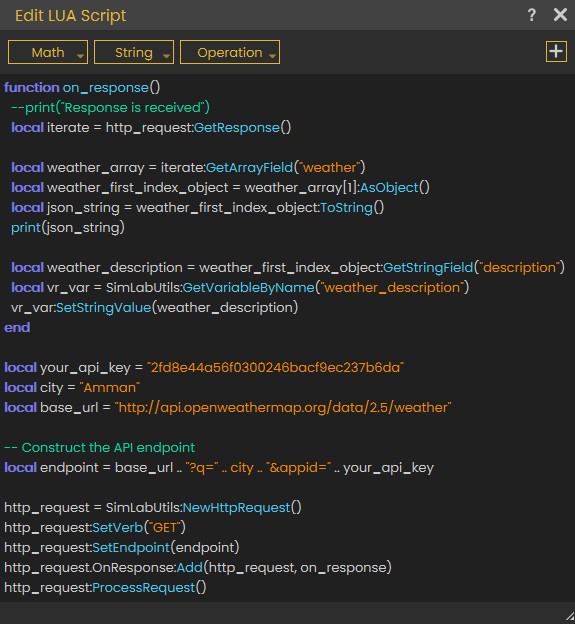
- Enter the Lua script of the example in the “Edit Lua Script” dialog box of the “Run Script” node graph as shown in Figure 2-5.
- Run the experience in SimLab VR Viewer.
- Congratulations! You should now see the weather description in the Variable Writer as demonstrated in Figure 2-6.


[3] Advanced: A Flask Server Application
Let’s create a simple Flask server application. Here are the steps:
Step 1: Install Flask. First, you need to install Flask. You can do this using pip, which is a package manager for Python. Open your terminal and type the following command:
pip install flaskStep 2: Create a new Python file. Next, create a new Python file for your application. You can name it anything you like, but for this example, let’s call it app.py.
Step 3: Import Flask. At the top of your app.py file, you need to import the Flask module:
from flask import Flask, jsonifyStep 4: Create an instance of the Flask class. Next, create an instance of the Flask class. This instance will be our WSGI application.
app = Flask(__name__)Step 5: Define a route. A route is what Flask uses to determine what should be returned when a specific URL is accessed. In this case, we want to return a user’s occupation when their user ID is accessed. Let’s create a dictionary to simulate a database of users and their occupations:
users = {
    '121410': 'Engineer',
    '121411': 'Doctor',
    '121412': 'Artist',
    # Add more users as needed
}
Then, define a route that will return a user’s occupation based on their user ID:
@app.route('/user/<id>', methods=['GET'])
def get_user(id):
    if id in users:
        return jsonify({id: users[id]})
    else:
        return jsonify({"error": "User not found"}), 404
Step 6: Run the application. Finally, tell Flask to run your application:
if __name__ == '__main__':
    app.run(debug=True)
Your complete app.py file should look like this:
from flask import Flask, jsonify

app = Flask(__name__)

users = {
    '121410': 'Engineer',
    '121411': 'Doctor',
    '121412': 'Artist',
    # Add more users as needed
}

@app.route('/user/<id>', methods=['GET'])
def get_user(id):
    if id in users:
        return jsonify({id: users[id]})
    else:
        return jsonify({"error": "User not found"}), 404

if __name__ == '__main__':
    app.run(debug=True)
To run your application, navigate to the directory containing your app.py file in the terminal and type python app.py. Your Flask server should start, and you can access it at http://localhost:5000/user/<id>, replacing <id> with the ID of the user whose occupation you want to retrieve. If the user exists, their occupation will be returned in JSON format. If the user does not exist, you will receive a 404 error and a JSON response of {"error": "User not found"}.
Remember to replace the users dictionary with your actual database or data source in a real application. This is just a simple example to get you started.
Now, let’s retrieve the occupation of some user ID* by using SimLab Training Builder:
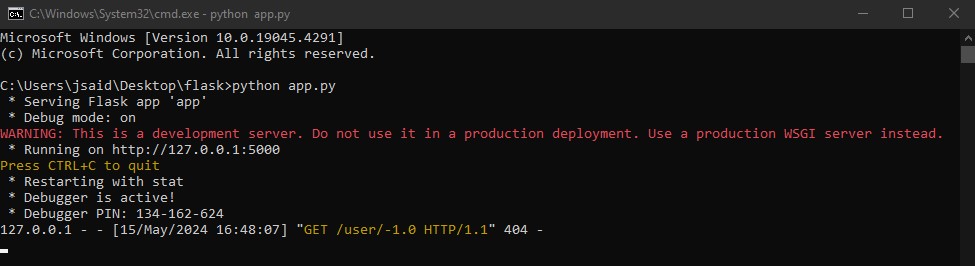
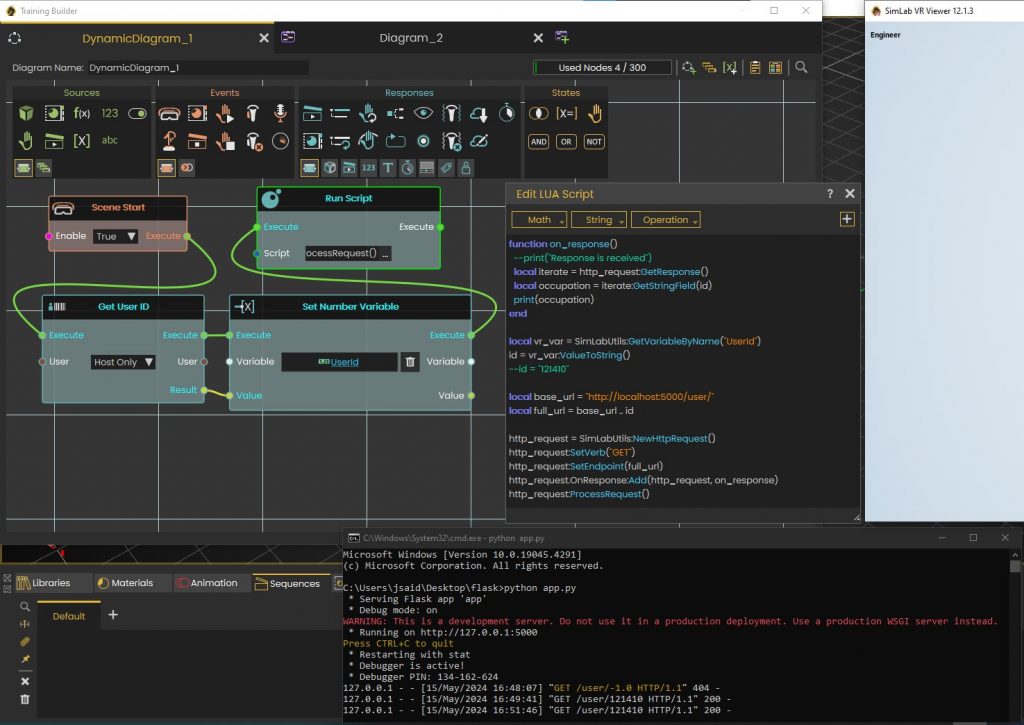
- Make sure that the server of the Flask application is active and running as show in Figure 3-1.
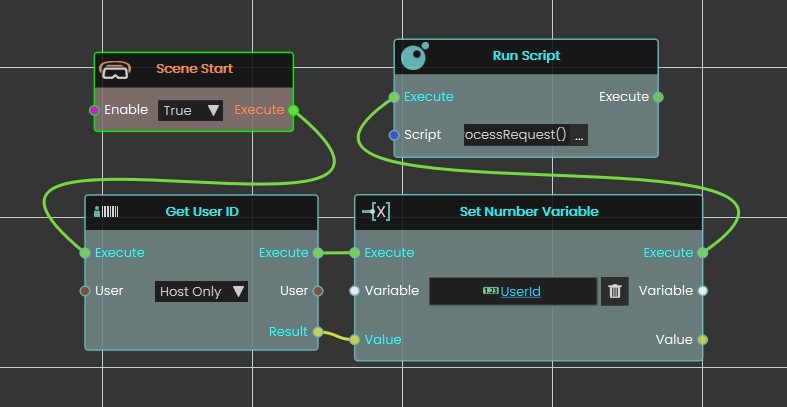
- Build the graph shown in Figure 3-2 in SimLab Training Builder by creating and connecting the necessary nodes.
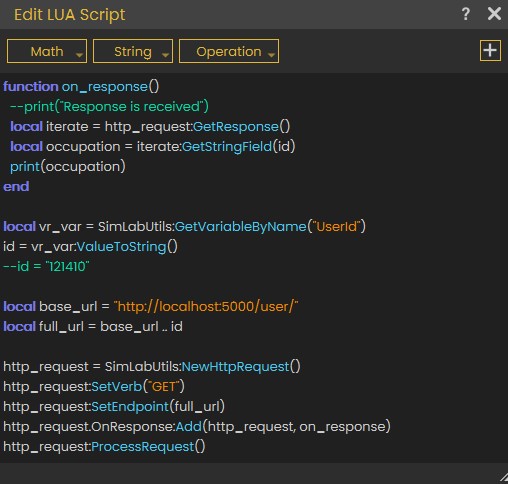
- Enter the Lua script presented in Figure 3-3 in the “Run Script” node graph. Also, you can copy it from below.
- Run the experience in SimLab VR Viewer. Figures 3-4 and 3-5 show the occupation of the requested user ID appearing as printed at the top-level corner of SimLab VR Viewer. (Note: Please ensure that you are signed into the SimLab VR Viewer to guarantee the user ID is properly assigned and does not remain at the default value of -1.)
function on_response()
  --print("Response is received")
  local iterate = http_request:GetResponse()
  local occupation = iterate:GetStringField(id)
  print(occupation)
end

local vr_var = SimLabUtils:GetVariableByName("UserId")
id = vr_var:ValueToString()
--id = "121410"

local base_url = "http://localhost:5000/user/"
local full_url = base_url .. id

http_request = SimLabUtils:NewHttpRequest()
http_request:SetVerb("GET")
http_request:SetEndpoint(full_url)
http_request.OnResponse:Add(http_request, on_response)
http_request:ProcessRequest()
* Every SimLab user has a unique global identifier.
Links to Relative External Resources:
-

1 How to Create Interactive VR Assembly & Disassembly Experiences with SimLab Composer
-

2 One Experience, Seamlessly Running on VR, MR, AR, and XR
-

3 Is My VR Experience Secure on the Cloud?
-

4 Fast, Affordable Custom VR Experiences – Pay Only if You’re Satisfied!
-

5 Looking for VR Creators for Our SimLab VR Store
-

6 Master 3D/CAD/VR File Conversion with SimLab CADVRter: Essential Tool for Designers and Engineers, and Related Professionals
-

7 Transforming Vocational Training with Virtual Reality
-

8 How to Start a VR Creation Service Business: A Step-by-Step Guide
-

9 From CAD to VR in less than 5 minutes
-
10 SimLab Composer vs VR Studio