
Part of the step by Step Guide, where you will learn how to transform you 3D Model to an interactive VR experience easily, using Simlab Composer.
This is the Third part of the Series, in which we are going to learn how to utilize Scene States.
To View the previous part of this series Click here.
You can download the Models used in the tutorials here ( Model 1 , Model 2 )
What exactly are Scene States?
Scene States are saved configuration for an object or scene, that stores several attributes. Once the stored scene state is applied, all the attributes that it contains will be applied in the scene.
Let’s say we have a room design with spotlights on the ceiling, and we need the spotlights to have two settings, one with white bright lights, and the other with yellow dim lights. The common solution for this would be to have 2 sets of spotlights, and to have different brightness and color values for each set, then you can to switch between them whenever you need to.
This solution might work with spotlights, but what if you need to display 2 cars each with different color? duplicating the car in 2 different colors would clutter your scene with replicas of objects, it would also be taxing on the scene size and the computer’s performance.
This is where Scene states shine bright, allowing you to have different configurations for the same model, at no cost at all!
How to create a “Scene State” in SimLab Composer?
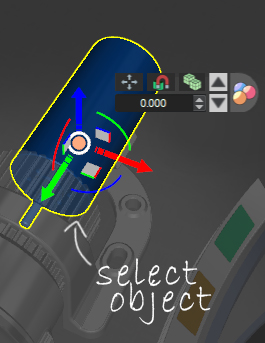
The first step is to select the object you intend to create a scene state for. It can be a single object, or multiple objects at once.
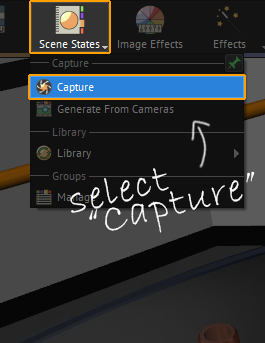
The next step is to go to the Scene States menu, and to select “Capture”.
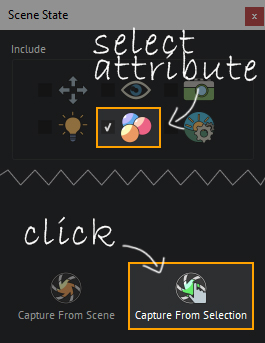
The last step in the process, is to select which attributes to store, and to click “Capture from Selection”.
The Attributes that Scene States store are :
- Transfomration.
- Visibility.
- Camera.
- Lights.
- Materials.
- Environment.
The Following Video explains the Process of implementing Scene States in VR, so watch it to get an in-depth look at the process.
Attaching a “Scene State” to an object
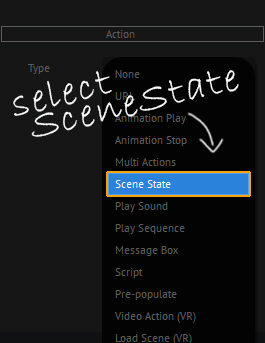
Select the object you need to set as a trigger to apply the scene state. Then, from the object’s attribute panel, set it’s action type to “Scene State”.

Select the created Scene state from the panel at the bottom to attach it.
These are all the steps you need to create a scene state based interaction in VR. You can create as many states as needed, then attach them to single or multiple triggers as you see fit.
If you have any questions, feel free to write them down in the comments section.
In the Next part of the Series, we are going to talk about Grabbable Sequences, which are based on animation sequences, but are controlled manually in VR.
Go to Part 4 of the series : Grabbable Sequences.
-

1 How to Create Interactive VR Assembly & Disassembly Experiences with SimLab Composer
-
2 One Experience, Seamlessly Running on VR, MR, AR, and XR
-
3 Fast, Affordable Custom VR Experiences – Pay Only if You’re Satisfied!
-

4 Looking for VR Creators for Our SimLab VR Store
-

5 Seamlessly integrate VR Quizzes and Surveys into your LMS
-
6 Transforming Vocational Training with Virtual Reality
-

7 Lua Scripting in SimLab Training Builder: From Beginner to Beyond
-
8 How to Start a VR Creation Service Business: A Step-by-Step Guide
-
9 9 FAQs on Usage and Creation of VR Experiences
-

10 From CAD to VR in less than 5 minutes
Pingback: How to add Animation to your Interactive VR Experience. • 3D CAD VR
Pingback: Controlling Animation in VR with Grabbable sequences • 3D CAD VR