
Create a VR Guide for training and education in SimLab Composer.
In the Animated Characters and Organic Models Blog post we talked about Skeletal Animation and Flexible bodies. We also talked about sources that would provide you with those models.
In this post we will go in depth on how to use flexible bodies to create VR Guides in SimLab Composer.
How can Flexible Bodies improve VR Training experiences
In real life, whether you are training or even working on something, having someone with you to guide you or assist you will surely encourage you and improve your performance. This principle gave birth to the idea of having human characters in VR experiences.

Human characters can serve the purpose of simulating a crowd around the user, making the experience more lively. In addition to that, they can be a part of the experience itself through aiding, guiding and assisting the user, which is what we are calling a VR Guide.
Importing VR Guide models to SimLab Composer
Once you are ready to import the flexible body to SimLab Composer, from the file menu select “Import“, then select the 3D file.
(Click here to learn more about flexible body sources ).
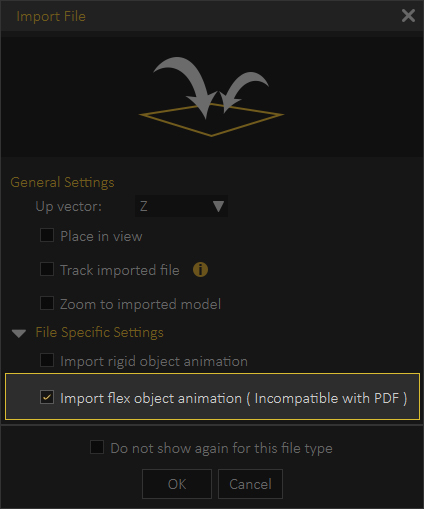
In the Import File dialogue, make sure you “Toggle on” the “Import flex object animation” option.
If you were to click on the Animation Sequences tab in the bottom panel, you will find a new group that contains the animation clips that SimLab Composer imported along with the 3D model.
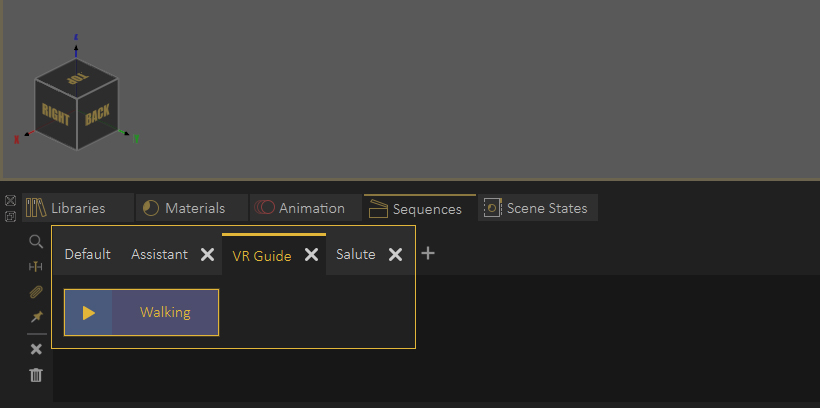
Each imported flexible body will have a unique animation sequences group in SimLab Composer.
To preview an Animation Sequence, hover over the sequence to reveal the play icon, then press the play button.
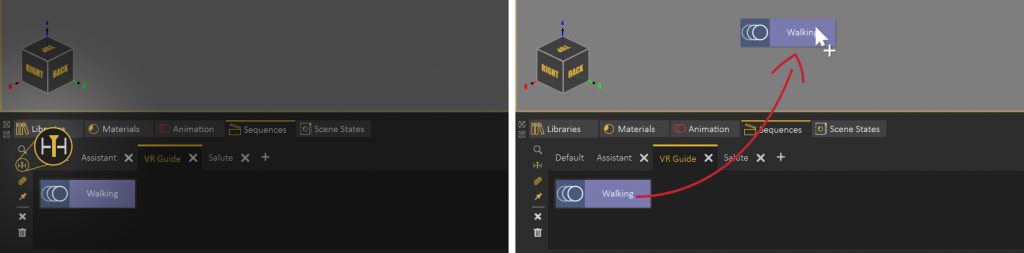
If you intend to edit the Animation Sequence, you need to send it to the Animation Timeline by either :
- Clicking the “Send to Timeline” button.
- Dragging the Sequence into the 3D area.
When importing FBX files Containing an Animation without a model, you can attach them to a model using the “Attach Sequence” option.
Attach Sequence Steps :
- Select the Animation Sequence that you intent to attach.
- Select the Model which you intend to attach the sequence to.
- Press the “Attach Sequence to object” button in the animation sequences panel.
Creating a path for the VR Guide to follow
You need to create a path in SimLab Composer to have the VR Guide follow it instead of manually moving the VR guide in the Scene.
To Create a path in SimLab Composer, follow these steps :
- From the Create menu, select “Paths” then “Create Path”.
- Select “Pick points on a plane” if you want the VR Guide to move on a single level, otherwise select “Pick in 3D space”.
- Set the Path type to “B-Spiline”.
- Start drawing the path by picking points with the left click.
- Click “Finish” to complete the path creation process.
To create an animation of the character following the path, do the following:
- Select the VR Guide 3D model.
- From the Object Animation menu select “Follow Path”.
- In the path motion dialogue, set the frame range where you want the animation to start and stop.
- From the same dialogue select “Pick Path”.
- Select the Path that you have created eariler.
- Rotate the VR Guide model to have it oriented with the path’s direction.
- Click the “Check Mark” to finish the path animation process.
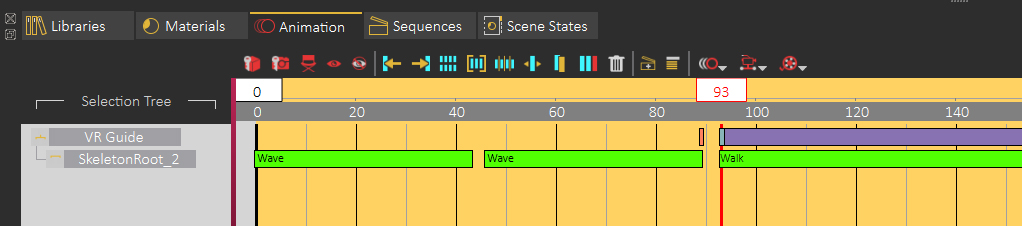
Combining multiple Animation Sequences
Now that we have created a path animation for the VR Guide, we can add the imported Animation Sequences to the Timline.
As we have previously explained Drag and Drop any initial Sequences you want for the Guide to play before moving on the path. Lets say we need the VR Guide to wave his hand before starting to move then when he gets to the end of the path he gives us a “Thumbs up”, what we have to do in this case is:
- Set the waving sequence’s position in the Timeline at frame “0”.
- Slide the path animation to the frame where the waving hand animation stops.
- Set the Current keyframe slider to where the path animation starts.
- Drag and Drop the walk cycle animation sequence to the 3D area to add it to the Timeline.
- In the send to timeline dialogue you need to enable blending and set the repition of the walking cycle. The repetition number depends on the distance the model crosses in each cycle, as well as the length of the path.
- You can add “Thumbs up” Animation sequence at the end of the walking animation to denote the end of the animation.
- Feel free to slide the animation sequences in the timeline to finely tune the animation to your liking.
- Select all the keyframes from frame “0” to the frame where the walk cycle ends and click on “Create Animation Sequence”.
- Type a name for the Animation Sequence and click “OK”.
- Select the keyframes after the walk cycle ends (the thumbs up animation with the transition) and click “Create Animation Sequence” again.
- type in a name for the Animation Sequence and click “OK”.
Implementing the Created Animation Sequences through The Training Builder
Now we need to use the “Training Builder” to set the conditions that when met, the new Animation Sequences play in VR.
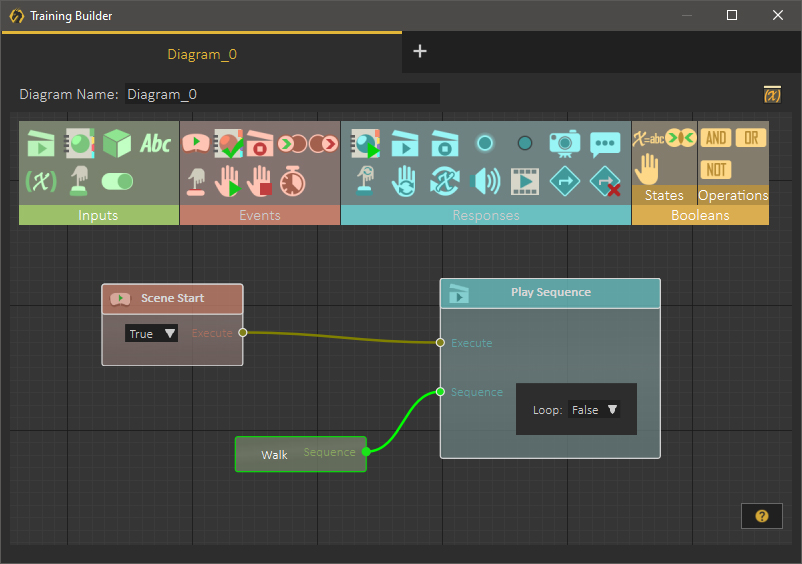
First Sequence Implementation
Implementing the first sequence which is the walking Animation Sequence is pretty simple, in the Training Builder :
- Create a “Scene start” event.
- Add a “Play Sequence” response.
- Attach the event’s execute channel to the response’s execute channel.
- Select the “Play Sequence” response then click on the walking animation sequence that you have created earlier to attach it.
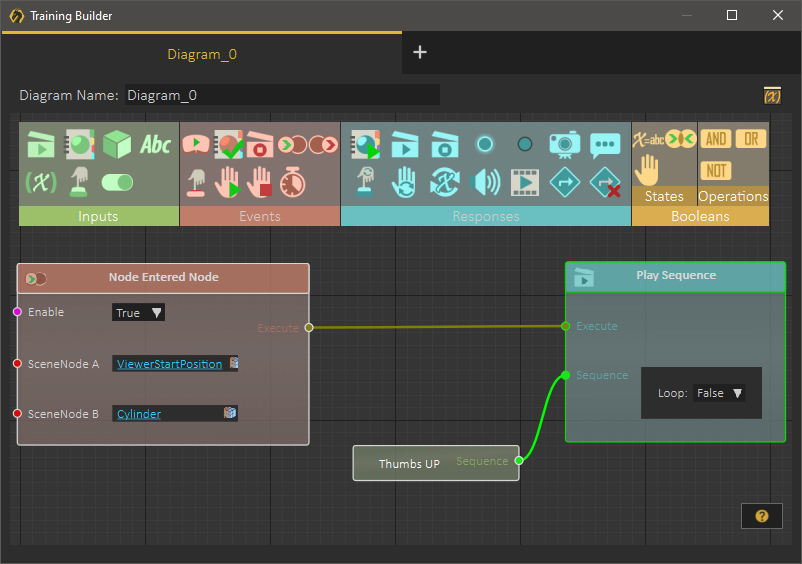
Second Sequence Implementation
We want the second Animation Sequence (The thumbs up sequence) to play when the user arrives at at the end of the path. So if the user followed the VR guide all the way to the end he gets a thumbs up!
The steps:
- Create a Cylinder by going to the Create Menu, then selecting shapes, then Cylinder.
- Place the cylinder at the end of the Animation Path, make sure it has a reasonable size.
- Set the alpha of the cylinder’s material to “0” since we do not want it to appear in the VR experience.
- In the Training Builder add a “Node Entered Node” event.
- Select the Viewer Start position and set it as SceneNode A.
- Select the Cylinder and set it as SceneNode B.
- Add a “Play Sequence” response then click on the second sequence (The Thumbs up Sequence) to attach it.
- Attach the response to event.
What we have Created is a VR experience where once it starts, the VR guide Waves at you then starts walking along the path. Once you (the User) follow him till the end of the path, then the VR Guide will give you a thumbs up.
You can Also check out this Blog post on how to create a fireball throwing character in SimLab Composer, or this one on Importing an animated Human Heart.
-

1 How to Create Interactive VR Assembly & Disassembly Experiences with SimLab Composer
-
2 One Experience, Seamlessly Running on VR, MR, AR, and XR
-
3 Is My VR Experience Secure on the Cloud?
-

4 Bought VR Headsets for Your School… and Now They’re Collecting Dust?
-

5 How to Choose the Best VR Solutions for Universities: A Comprehensive Guide
-
6 Fast, Affordable Custom VR Experiences – Pay Only if You’re Satisfied!
-

7 Looking for VR Creators for Our SimLab VR Store
-

8 Why SimLab Soft is Creating VR Training for Medicine and Nursing Students
-

9 Seamlessly integrate VR Quizzes and Surveys into your LMS
-

10 Master 3D/CAD/VR File Conversion with SimLab CADVRter: Essential Tool for Designers and Engineers, and Related Professionals
Pingback: Organic Models Animation in SimLab Composer • 3D CAD VR
Pingback: Follow Path Animation • 3D CAD VR Walthrough Visualisation